

Can You Open Multiple Instances Of An App In Android
1. Introduction
In this codelab you'll learn the importance of Dependency Injection (DI) to create a solid and extensible application that scales to large projects. We'll use Dagger as the DI tool to manage dependencies.
Dependency injection (DI) is a technique widely used in programming and well suited to Android development. By following the principles of DI, you lay the groundwork for a good app architecture.
Implementing dependency injection provides you with the following advantages:
- Reusability of code.
- Ease of refactoring.
- Ease of testing.
If you run into any issues (code bugs, grammatical errors, unclear wording, etc.) as you work through this codelab, please report the issue via the Report a mistake link in the lower left corner of the codelab.
Prerequisites
- Experience with Kotlin syntax.
- You understand Dependency Injection and know what the benefits of using Dagger in your Android app are.
What you'll learn
- How to use Dagger in your Android app at scale.
- Relevant Dagger concepts to create a more solid and sustainable app.
- Why you might need Dagger subcomponents and how to use them.
- How to test your application that uses Dagger with unit and instrumentation tests.
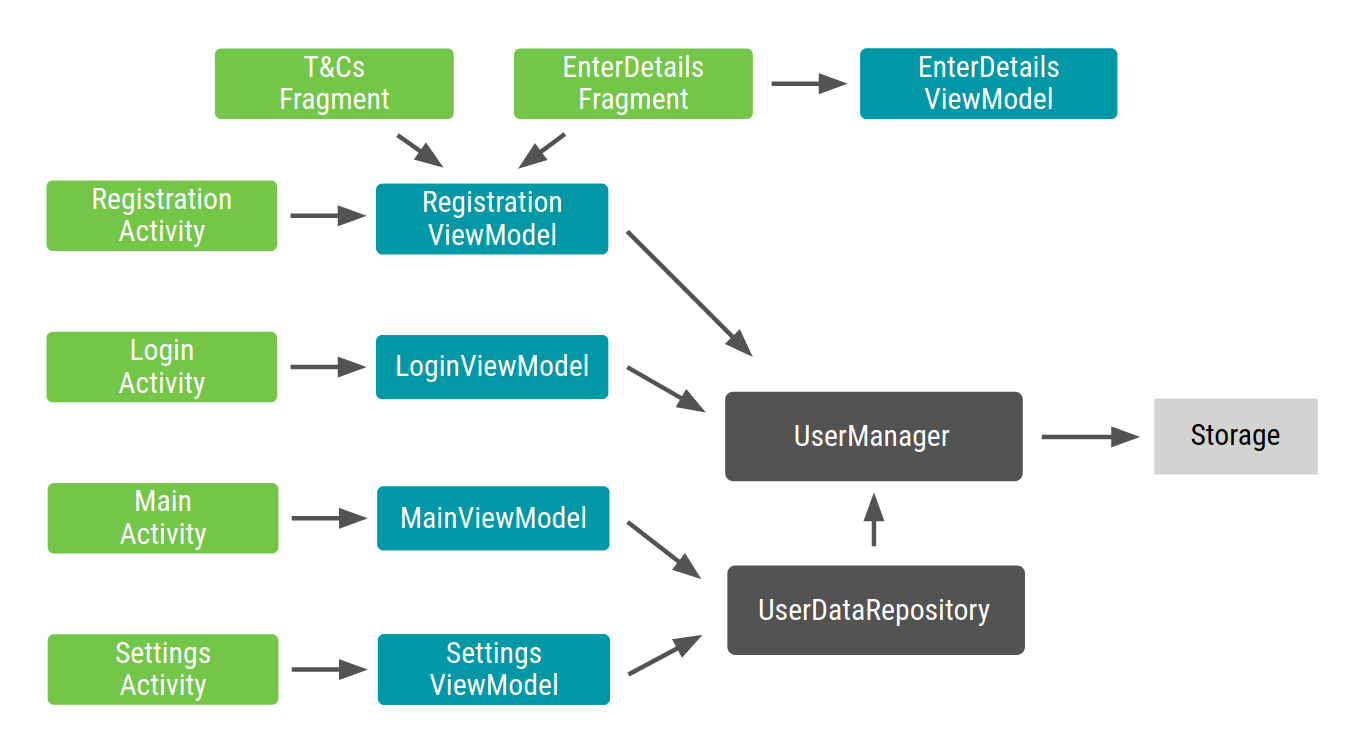
By the end of the codelab, you'll have created and tested an application graph like this:
The arrows represent dependencies between objects. This is what we call the application graph: all the classes of the app and the dependencies between them.
Keep reading and learn how to do it!
2. Getting set up
Get the Code
Get the codelab code from GitHub:
$ git clone https://github.com/googlecodelabs/android-dagger
Alternatively you can download the repository as a Zip file:
Open Android Studio
If you need to download Android Studio, you can do so here.
Project set up
The project is built in multiple GitHub branches:
-
mainis the branch you checked out or downloaded. The codelab's starting point. -
1_registration_main,2_subcomponents, and3_dagger_appare intermediate steps towards the solution. -
solutioncontains the solution to this codelab.
We recommend you to follow the codelab step by step at your own pace starting with the main branch.
During the codelab, you'll be presented with snippets of code that you'll have to add to the project. In some places, you'll also have to remove code that will be explicitly mentioned and in comments on the code snippets.
As checkpoints, you have the intermediate branches available in case you need help with a particular step.
To get the solution branch using git, use this command:
$ git clone -b solution https://github.com/googlecodelabs/android-dagger
Or download the solution code from here:
Frequently asked questions
- How do I install Android Studio?
- How do I set up a device for development?
3. Running the sample app
First, let's see what the starting sample app looks like. Follow these instructions to open the sample app in Android Studio.
- If you downloaded the zip archive, unzip the file locally.
- Open the project in Android Studio.
- Click the
 Run button, and either choose an emulator or connect your Android device. The Registration screen should appear.
The app consists of 4 different flows (implemented as Activities):
- Registration: The user can register by introducing username, password and accepting our terms and conditions.
- Login: The user can log in using the credentials introduced during the registration flow and can also unregister from the app.
- Home: The user is welcomed and can see how many unread notifications they have.
- Settings: The user can log out and refresh the number of unread notifications (which produces a random number of notifications).
The project follows a typical MVVM pattern where all the complexity of the View is deferred to a ViewModel. Take a moment to familiarize yourself with the structure of the project.
The arrows represent dependencies between objects. This is what we call the application graph : all the classes of the app and the dependencies between them.
The code in the main branch manages dependencies manually. Instead of creating them by hand, we will refactor the app to use Dagger to manage them for us.
Disclaimer
This codelab is not opinionated in the way you architect your app. It's intended to showcase different ways you could plug Dagger into your app architecture: single Activity with multiple fragments (registration and login flows) or multiple Activities (main app flow).
Complete the codelab to understand the main concepts of Dagger so you can apply them to your project accordingly. Some patterns used in this codelab are not the recommended way to build Android applications, however, they're the best ones to explain Dagger.
To learn more about Android app architecture, visit our Guide to App architecture page.
Why Dagger?
If the application gets larger, we will start writing a lot of boilerplate code (e.g. with Factories) which can be error-prone. Doing this wrong can lead to subtle bugs and memory leaks in your app.
In the codelab, we will see how to use Dagger to automate this process and generate the same code you would have written by hand otherwise.
Dagger will be in charge of creating the application graph for us. We'll also use Dagger to perform field injection in our Activities instead of creating the dependencies by hand.
More information about Why Dagger here.
4. Adding Dagger to the project
To add Dagger to your project, open the app/build.gradle file and add the two Dagger dependencies and the kapt plugin to the top of the file.
app/build.gradle
plugins { id 'com.android.application' id 'kotlin-android' id 'kotlin-android-extensions' id 'kotlin-kapt' } ... dependencies { ... def dagger_version = "2.40" implementation "com.google.dagger:dagger:$dagger_version" kapt "com.google.dagger:dagger-compiler:$dagger_version" } After adding these lines to the file, click on the "Sync Now" button that appears at the top of the file. That will sync the project and download the new dependencies. We're now ready to use Dagger in the app.
Dagger is implemented using Java's annotations model. It generates code at compile-time using an annotation processor. Annotation processors are supported in Kotlin with the kapt compiler plugin. They are enabled by adding id 'kotlin-kapt' to the top of the file below the id 'kotlin-android-extensions' line.
In the dependencies, the dagger library contains all the annotations you can use in your app and dagger-compiler is the annotation processor that will generate the code for us. The latter will not be packed into your app.
You can find the latest available versions of Dagger here.
5. @Inject annotation
Let's start refactoring the Registration flow to use Dagger.
In order to build the application graph automatically for us, Dagger needs to know how to create instances for the classes in the graph. One way to do this is by annotating the constructor of classes with @Inject. The constructor parameters will be the dependencies of that type.
Open the RegistrationViewModel.kt file and replace the class definition with this one:
RegistrationViewModel.kt
// @Inject tells Dagger how to provide instances of this type // Dagger also knows that UserManager is a dependency class RegistrationViewModel @Inject constructor(val userManager: UserManager) { ... } In Kotlin, to apply an annotation to the constructor, you need to specifically add the keyword constructor and introduce the annotation just before it as shown in the code snippet above.
With the @Inject annotation, Dagger knows:
- How to create instances of type
RegistrationViewModel. -
RegistrationViewModelhasUserManageras dependency since the constructor takes an instance ofUserManageras an argument.
Dagger doesn't know how to create types of UserManager yet. Follow the same process, and add the @Inject annotation to UserManager 's constructor.
Open the UserManager.kt file and replace the class definition with this one:
UserManager.kt
class UserManager @Inject constructor(private val storage: Storage) { ... } Now, Dagger knows how to provide instances of RegistrationViewModel and UserManager.
Since UserManager's dependency (i.e. Storage) is an interface, we need to tell Dagger how to create an instance of that in a different way, we'll cover that later.
Views require objects from the graph
Certain Android framework classes such as Activities and Fragments are instantiated by the system so Dagger can't create them for you. For Activities specifically, any initialization code needs to go to the onCreate method. Because of that, we cannot use the @Inject annotation in the constructor of a View class as we did before (that is what is called constructor injection). Instead, we have to use field injection.
Instead of creating the dependencies an Activity requires in the onCreate method as we do with manual dependency injection, we want Dagger to populate those dependencies for us. For field injection (that is commonly used in Activities and Fragments), we annotate with @Inject the fields that we want Dagger to provide.
In our app, RegistrationActivity has a dependency on RegistrationViewModel.
If you open RegistrationActivity.kt, we're creating the ViewModel in the onCreate method just before calling the supportFragmentManager. We don't want to create it by hand, we want Dagger to provide it. For that, we need to:
- Annotate the field with
@Inject. - Remove its instantiation from the
onCreatemethod.
RegistrationActivity.kt
class RegistrationActivity : AppCompatActivity() { // @Inject annotated fields will be provided by Dagger @Inject lateinit var registrationViewModel: RegistrationViewModel override fun onCreate(savedInstanceState: Bundle?) { ... // Remove following line registrationViewModel = RegistrationViewModel((application as MyApplication).userManager) } } How can we tell Dagger which objects need to be injected into RegistrationActivity? We need to create the Dagger graph (or application graph) and use it to inject objects into the Activity.
6. @Component annotation
We want Dagger to create the graph of dependencies of our project, manage them for us and be able to get dependencies from the graph. To make Dagger do it, we need to create an interface and annotate it with @Component. Dagger will create a Container as we would have done with manual dependency injection.
An interface annotated with @Component will make Dagger generate code with all the dependencies required to satisfy the parameters of the methods it exposes. Inside that interface, we can tell Dagger that RegistrationActivity requests injection.
Create a new package called di under com.example.android.dagger (same level as other packages such as registration). Inside that package, create a new Kotlin file called AppComponent.kt and define the interface as we described above:
app/src/main/java/com/example/android/dagger/di/AppComponent.kt
package com.example.android.dagger.di import com.example.android.dagger.registration.RegistrationActivity import dagger.Component // Definition of a Dagger component @Component interface AppComponent { // Classes that can be injected by this Component fun inject(activity: RegistrationActivity) } With the inject(activity: RegistrationActivity)method in the @Component interface, we're telling Dagger that RegistrationActivity requests injection and that it has to provide the dependencies which are annotated with @Inject (i.e. RegistrationViewModel as we defined in the previous step).
Since Dagger has to create an instance of RegistrationViewModel, internally, it also needs to satisfy RegistrationViewModel's dependencies (i.e. UserManager). If during this recursive process of finding dependencies Dagger doesn't know how to provide a particular dependency, it will fail at compile time saying there's a dependency that it cannot satisfy.
Building the app triggers Dagger's annotation processor that will generate the code we need for managing our dependencies. If we do it by using the build button  in Android Studio, we get the following error (you might need to enable soft-wrap using this button
  to see the error easily):
dagger/app/build/tmp/kapt3/stubs/debug/com/example/android/dagger/di/AppComponent.java:7: error: [Dagger/MissingBinding] com.example.android.dagger.storage.Storage cannot be provided without an @Provides-annotated method Let's break this error message down. First, it's telling us we're getting an error in AppComponent. The error is of type [Dagger/MissingBinding] which means that Dagger doesn't know how to provide a certain type. If we keep reading, it says that Storage cannot be provided without an @Provides-annotated method.
We haven't told Dagger how to provide an object of type Storage which is needed by UserManager!
7. @Module, @Binds and @BindsInstance annotations
The way we tell Dagger how to provide Storage is different because Storage is an interface and as such cannot be instantiated directly. We need to tell Dagger what implementation of Storage we want to use. In this case it's SharedPreferencesStorage.
To do this we will use a Dagger Module. A Dagger Module is a class that is annotated with @Module.
Similar to Components, Dagger Modules tell Dagger how to provide instances of a certain type. Dependencies are defined using the @Provides and @Binds annotations.
Since this Module will contain information about storage, let's create another file called StorageModule.kt in the same package we created AppComponent.kt. In that file, we define a class called StorageModule and annotate it with @Module.
app/src/main/java/com/example/android/dagger/di/StorageModule.kt
package com.example.android.dagger.di import dagger.Module // Tells Dagger this is a Dagger module @Module class StorageModule { } @Binds annotation
Use @Binds to tell Dagger which implementation it needs to use when providing an interface.
@Binds must annotate an abstract function. The return type of the abstract function is the interface we want to provide an implementation for (i.e. Storage). The implementation is specified by adding a parameter with the interface implementation type (i.e. SharedPreferencesStorage).
StorageModule.kt
// Tells Dagger this is a Dagger module // Because of @Binds, StorageModule needs to be an abstract class @Module abstract class StorageModule { // Makes Dagger provide SharedPreferencesStorage when a Storage type is requested @Binds abstract fun provideStorage(storage: SharedPreferencesStorage): Storage } With the code above, we told Dagger "when you need a Storage object use SharedPreferencesStorage"..
Note the following:
-
provideStorageis just an arbitrary method name, it could be anything we like, it doesn't matter to Dagger. What Dagger cares about is the parameter and the return type. -
StorageModuleisabstractnow because theprovideStorageis abstract.
We've told Dagger that when a Storage object is requested it should create an instance of SharedPreferencesStorage, but we haven't yet told Dagger how
to create instances of SharedPreferencesStorage. We do that the same way as before, by annotating the constructor of SharedPreferencesStorage with @Inject.
SharedPreferencesStorage.kt
// @Inject tells Dagger how to provide instances of this type class SharedPreferencesStorage @Inject constructor(context: Context) : Storage { ... } The application graph needs to know about StorageModule. For that, we include it in AppComponent with the modules parameter inside the @Component annotation as follows:
AppComponent.kt
// Definition of a Dagger component that adds info from the StorageModule to the graph @Component(modules = [StorageModule::class]) interface AppComponent { // Classes that can be injected by this Component fun inject(activity: RegistrationActivity) } In this way, AppComponent can access the information that StorageModule contains. In a more complex application, we could also have a NetworkModule that adds information on how to provide an OkHttpClient, or how to configure Gson or Moshi, for example.
If we try to build again we get an error very similar to what we got before! This time, what Dagger doesn't find is: Context.
@BindsInstance annotation
How can we tell Dagger how to provide Context? Context is provided by the Android system and therefore constructed outside of the graph. Since Context is already available at the time we'll be creating an instance of the graph, we can pass it in.
The way to pass it in is with a Component Factory and using the @BindsInstance annotation.
AppComponent.kt
@Component(modules = [StorageModule::class]) interface AppComponent { // Factory to create instances of the AppComponent @Component.Factory interface Factory { // With @BindsInstance, the Context passed in will be available in the graph fun create(@BindsInstance context: Context): AppComponent } fun inject(activity: RegistrationActivity) } We're declaring an interface annotated with @Component.Factory. Inside, there's a method that returns the component type (i.e. AppComponent) and has a parameter of type Context annotated with @BindsInstance.
@BindsInstance tells Dagger that it needs to add that instance in the graph and whenever Context is required, provide that instance.
Project builds successfully
Your project should now build with no errors.. Dagger has generated the application graph successfully and you're ready to use it.
The implementation of the application graph is automatically generated by the annotation processor. The generated class is called Dagger{ComponentName} and contains the implementation of the graph. We'll use the generated DaggerAppComponent class in the next section.
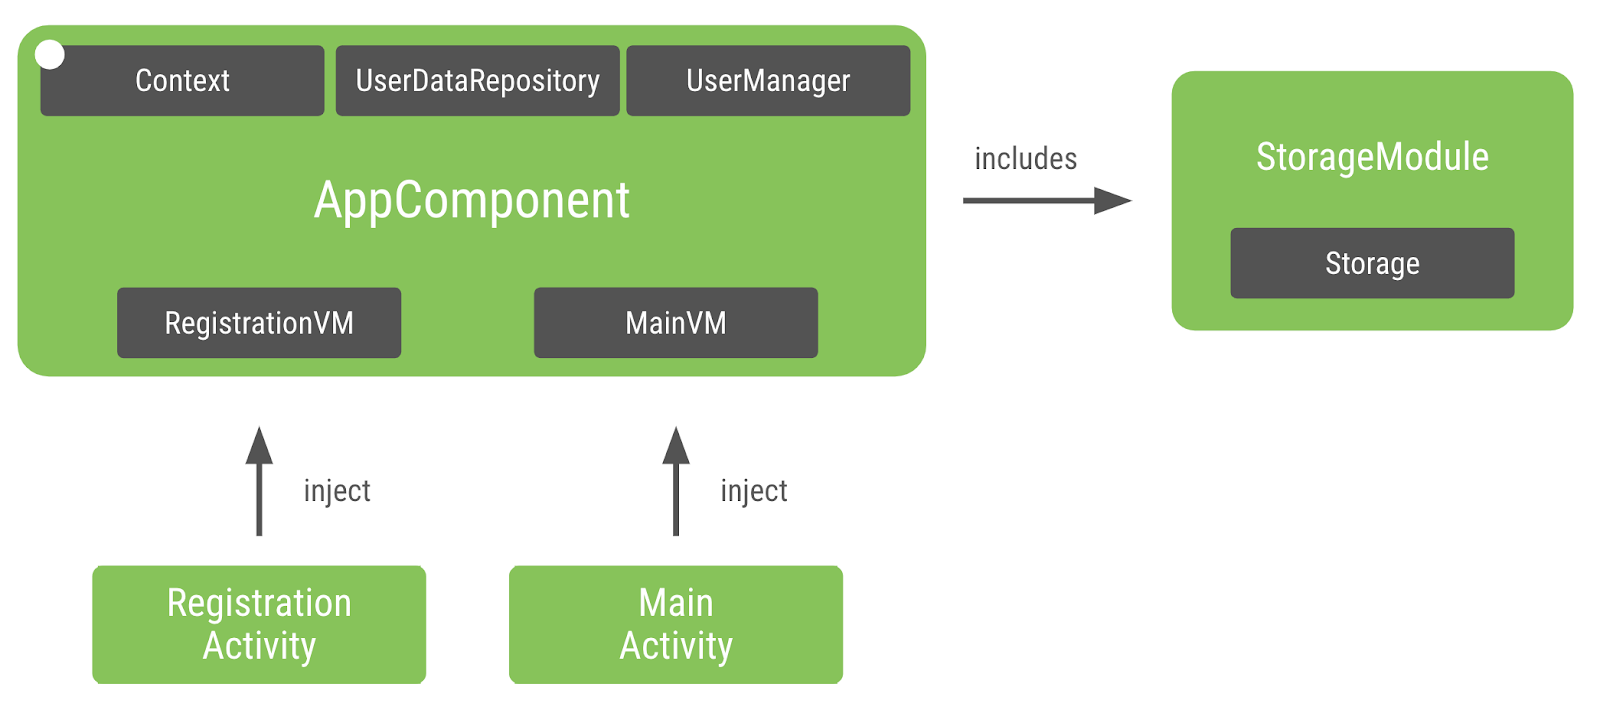
What does our AppComponent graph look like now?
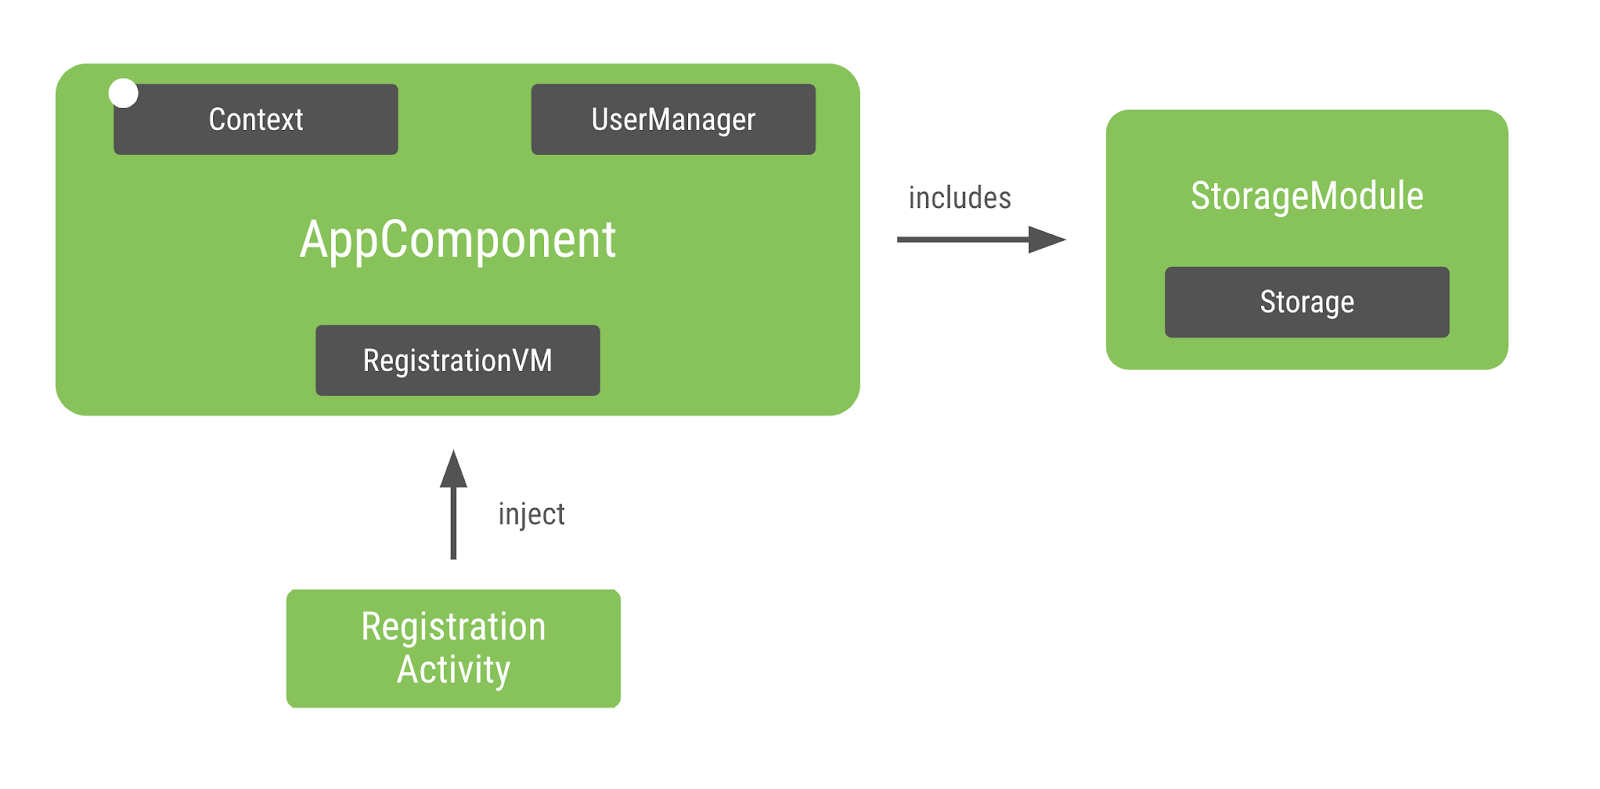
AppComponent includes StorageModule with information on how to provide Storage instances. Storage has a dependency on Context but since we're providing it when we create the graph, Storage has all its dependencies covered.
The instance of Context is passed in the AppComponent's factory create method. Therefore, we'll have the same instance provided anytime an object needs Context. That's represented with a white dot in the diagram.
Now, RegistrationActivity can access the graph to get objects injected (or populated) by Dagger, in this case RegistrationViewModel (because it is a field which is annotated with @Inject).
As AppComponent needs to populate RegistrationViewModel for the RegistrationActivity, it needs to create an instance of RegistrationViewModel. To do this it needs to satisfy RegistrationViewModel's dependencies (i.e. UserManager) and create an instance of UserManager too. As UserManager has its constructor annotated with @Inject, Dagger will use it to create instances. UserManager has a dependency on Storage but since it's already in the graph, nothing else is needed.
8. Injecting the graph into an Activity
In Android, you usually create a Dagger graph that lives in your Application class because you want the graph to be in memory as long as the app is running. In this way, the graph is attached to the app's lifecycle. In our case, we also want to have the application Context available in the graph. As advantages, the graph is available to other Android framework classes (that can access with their Context) and it's also good for testing since you can use a custom Application class in tests.
Let's add an instance of the graph (i.e. AppComponent) to our custom Application: MyApplication.
MyApplication.kt
open class MyApplication : Application() { // Instance of the AppComponent that will be used by all the Activities in the project val appComponent: AppComponent by lazy { // Creates an instance of AppComponent using its Factory constructor // We pass the applicationContext that will be used as Context in the graph DaggerAppComponent.factory().create(applicationContext) } open val userManager by lazy { UserManager(SharedPreferencesStorage(this)) } } As we mentioned in the previous section, Dagger generated a class called DaggerAppComponent containing the implementation of the AppComponent graph when we built the project. Since we defined a Component Factory with the @Component.Factory annotation, we can call .factory() that is a static method of DaggerAppComponent. With that, we can now call the create method we defined inside the factory where we pass in the Context, in this case applicationContext.
We do that using a Kotlin lazy initialization so that the variable is immutable and it's only initialized when needed.
We can use this instance of the graph in RegistrationActivity to make Dagger inject the fields annotated with @Inject. How can we do it? We have to call the AppComponent's inject method that takes RegistrationActivity as a parameter.
We also need to remove code which instantiates the fields so we don't overwrite the ones which Dagger now instantiates for us.RegistrationActivity.kt
class RegistrationActivity : AppCompatActivity() { // @Inject annotated fields will be provided by Dagger @Inject lateinit var registrationViewModel: RegistrationViewModel override fun onCreate(savedInstanceState: Bundle?) { // Ask Dagger to inject our dependencies (application as MyApplication).appComponent.inject(this) super.onCreate(savedInstanceState) setContentView(R.layout.activity_registration) // REMOVE THIS LINE registrationViewModel = RegistrationViewModel((application as MyApplication).userManager) supportFragmentManager.beginTransaction() .add(R.id.fragment_holder, EnterDetailsFragment()) .commit() } ... } Calling appComponent.inject(this) populates the fields that RegistrationActivity has annotated with @Inject (i.e. registrationViewModel).
RegistrationActivity is already using Dagger to manage its dependencies! You can go ahead and run the app .
Did you find a bug? The Main page should appear after the Registration flow! But it doesn't and Login does. Why? The other flows of the app are not using the Dagger graph yet.
MainActivity is still using the userManager defined in MyApplication whereas Registration has used a userManager instance from the Dagger graph.
Let's use Dagger in the Main flow too to fix this issue.
Using Dagger in the Main Flow
As before, we want MainActivity to use Dagger to manage its dependencies. In this case, MainViewModel and UserManager.
To tell Dagger that MainActivity requests injection, we have to add another function with MainActivity as a parameter to the AppComponent's interface.
AppComponent.kt
@Component(modules = [StorageModule::class]) interface AppComponent { ... // Classes that can be injected by this Component fun inject(activity: RegistrationActivity) fun inject(activity: MainActivity) } The name of the functions don't matter (that's why we called both of them inject), what matters is the parameter type. Let's define what we want to inject from Dagger in the MainActivity and inject the graph:
- Add
userManageras a member of the class (instead of a local variable inonCreate) and inject the fieldsuserManagerandmainViewModelwith@Inject.
MainActivity.kt
class MainActivity : AppCompatActivity() { // @Inject annotated fields will be provided by Dagger @Inject private lateinit var userManager: UserManager @Inject private lateinit var mainViewModel: MainViewModel ... } - Delete
userManagerandmainViewModelinitializations since that will be done by Dagger.
MainActivity.kt
class MainActivity : AppCompatActivity() { override fun onCreate(savedInstanceState: Bundle?) { ... // Remove this line userManager = (application as MyApplication).userManager if (!userManager.isUserLoggedIn()) { ... } else { ... // Remove this line too mainViewModel = MainViewModel(userManager.userDataRepository!!) ... } } ... } - Inject
MainActivityinappComponentto populate the injected fields.
MainActivity.kt
class MainActivity : AppCompatActivity() { ... override fun onCreate(savedInstanceState: Bundle?) { (application as MyApplication).appComponent.inject(this) super.onCreate(savedInstanceState) ... } } UserManager is already available in the graph so Dagger knows how to provide it but MainViewModel is not. Let's add the @Inject annotation to its constructor so that Dagger knows how to create instances of the class.
MainViewModel.kt
class MainViewModel @Inject constructor(private val userDataRepository: UserDataRepository) { ... } Since MainViewModel has a dependency on UserDataRepository, we have to annotate it with @Inject too.
UserDataRepository.kt
class UserDataRepository @Inject constructor(private val userManager: UserManager) { ... } Since UserManager is already part of the graph, Dagger has all the information it needs to build the graph successfully.
Current state of the application graph at this point
If you try to build the project again, you should get another error.
What does it say? error: Dagger does not support injection into private fields. That's one of the disadvantages of Dagger, injected fields need to have at least visibility package-private or higher. They cannot be private to their own class.
Remove the private modifier from the fields definition.
MainActivity.kt
class MainActivity : AppCompatActivity() { @Inject lateinit var userManager: UserManager @Inject lateinit var mainViewModel: MainViewModel ... } The project can be successfully built now. Let's run the app again. When you run again, since we registered a user before, you'll be presented with the Login screen. To start fresh as we had run the application for the first time, click on "Unregister" to go to the Registration flow.
When you register, it doesn't go to the Main page! It goes to the Login Activity again. The bug is happening again, but why? Both main and registration flow are getting UserManager injected from the application graph.
The problem is that Dagger always provides a new instance of a type (in our case UserManager) when injecting dependencies by default. How can we make Dagger to reuse the same instance every time? With Scoping.
9. Using Scopes
Sometimes, you might want to provide the same instance of a dependency in a Component for multiple reasons:
- You want other types that have this type as dependency to share the same instance (e.g.
UserManagerin our case). - An object is very expensive to create and you don't want to create a new instance every time it's declared as dependency (e.g. a Json parser).
Use Scopes to have a unique instance of a type in a Component. This is what is also called "to scope a type to the Component's lifecycle". Scoping a type to a Component means that the same instance of that type will be used every time the type needs to be provided.
For AppComponent, we can use the @Singleton scope annotation that is the only scope annotation that comes with the javax.inject package. If we annotate a Component with @Singleton, all the classes also annotated with @Singleton will be scoped to its lifetime.
Open the AppComponent.kt file and annotate the Component with @Singleton.
AppComponent.kt
@Singleton @Component(modules = [StorageModule::class]) interface AppComponent { ... } Now, classes annotated with @Singleton will be scoped to AppComponent. Let's annotate UserManager to have a unique instance of it in the application graph.
UserManager.kt
@Singleton class UserManager @Inject constructor(private val storage: Storage) { ... } Now, the same instance of UserManager will be provided to RegistrationActivity and MainActivity.
Run the app again and go to the Registration flow to start fresh as we did before. Now, when you complete registration, it goes to the Main flow! Problem solved.
In case you're curious, this is what the application graph looks like now:

Current state of the graph with a unique instance of UserManager in AppComponent
Notice that UserManager is also marked with the white dot. As it happened with Context, the same instance of UserManager will be provided when required as dependency in the same instance of AppComponent.
10. Subcomponents
Registration Flow
Let's keep refactoring our app to Dagger. Registration Fragments are still using manual dependency injection, let's migrate those now.
Since we want both EnterDetailsFragment and TermsAndConditionsFragment to be injected by Dagger, we need to let Dagger know by adding them to the AppComponent interface:
AppComponent.kt
@Singleton @Component(modules = [StorageModule::class]) interface AppComponent { ... fun inject(activity: RegistrationActivity) fun inject(fragment: EnterDetailsFragment) fun inject(fragment: TermsAndConditionsFragment) fun inject(activity: MainActivity) } Which fields do we want Dagger to provide? In EnterDetailsFragment, we want Dagger to populate both ViewModels. We do that by annotating the fields with @Inject and removing the private visibility modifier.
EnterDetailsFragment.kt
class EnterDetailsFragment : Fragment() { @Inject lateinit var registrationViewModel: RegistrationViewModel @Inject lateinit var enterDetailsViewModel: EnterDetailsViewModel ... } But we also have to remove the manual instantiations we have in the code. Remove the following lines:
EnterDetailsFragment.kt
class EnterDetailsFragment : Fragment() { override fun onCreateView(...): View? { ... // Remove following lines registrationViewModel = (activity as RegistrationActivity).registrationViewModel enterDetailsViewModel = EnterDetailsViewModel() ... } } Now, we can use the appComponent instance in the Application class to inject the Fragments. For Fragments, we inject Components using the onAttach method after calling super.onAttach.
EnterDetailsFragment.kt
class EnterDetailsFragment : Fragment() { override fun onAttach(context: Context) { super.onAttach(context) (requireActivity().application as MyApplication).appComponent.inject(this) } } What is left for Dagger to know is how to provide instances of EnterDetailsViewModel. We do that by annotating its constructor with @Inject. RegistrationViewModel it's already annotated with @Inject, RegistrationActivity needed it before.
EnterDetailsViewModel.kt
class EnterDetailsViewModel @Inject constructor() { ... } EnterDetailsFragment is ready, we have to do the same for TermsAndConditionsFragment now:
- Annotate with
@Injectthe fields we want Dagger to provide (i.e.registrationViewModel) and remove the private visibility modifier. - Remove the
registrationViewModelinstantiation we needed for manual dependency injection. - Inject Dagger in the
onAttachmethod.
TermsAndConditionsFragment.kt
class TermsAndConditionsFragment : Fragment() { @Inject lateinit var registrationViewModel: RegistrationViewModel override fun onAttach(context: Context) { super.onAttach(context) (requireActivity().application as MyApplication).appComponent.inject(this) } override fun onCreateView(...): View? { ... // Remove following line registrationViewModel = (activity as RegistrationActivity).registrationViewModel ... } } Now you can run the app.
What happened? It crashed after registering! The problem is that different instances of RegistrationViewModel are being injected in RegistrationActivity, EnterDetailsFragment, and TermsAndConditionsFragment. However, that's not what we want. We want the same instance to be injected for the Activity and Fragments.
What if we annotate RegistrationViewModel with @Singleton? That would solve the problem for now but it will create problems in the future:
- We wouldn't want an instance of
RegistrationViewModelto be in memory all the time after the flow has finished. - We want different instances of
RegistrationViewModelfor different registration flows. If the user registers and unregisters, we don't want the data from the previous registration to be present.
We want the registration Fragments to reuse the same ViewModel coming from the Activity, but if the Activity changes, we want a different instance. We need to scope RegistrationViewModel to RegistrationActivity, for that, we can create a new Component for the registration flow and scope the ViewModel to that new registration Component. To achieve this we use Dagger subcomponents.
Dagger Subcomponents
A RegistrationComponent must be able to access the objects from AppComponent since RegistrationViewModel depends on UserRepository. The way to tell Dagger that we want a new Component to use part of another Component is with Dagger Subcomponents. The new component (i.e. RegistrationComponent) must be a subcomponent of the one containing shared resources (i.e. AppComponent).
Since this is specific to registration, create a new file named RegistrationComponent.kt inside the registration package. Here you can create a new interface called RegistrationComponent annotated with @Subcomponent that tells Dagger that this is a Subcomponent.
registration/RegistrationComponent.kt
package com.example.android.dagger.registration import dagger.Subcomponent // Definition of a Dagger subcomponent @Subcomponent interface RegistrationComponent { } This Component needs to contain registration specific information. For that, we need to:
- Add the inject methods from AppComponent that are specific to Registration, i.e.
RegistrationActivity,EnterDetailsFragment, andTermsAndConditionsFragment. - Create a subcomponent Factory that we can use to create instances of this subcomponent.
RegistrationComponent.kt
// Definition of a Dagger subcomponent @Subcomponent interface RegistrationComponent { // Factory to create instances of RegistrationComponent @Subcomponent.Factory interface Factory { fun create(): RegistrationComponent } // Classes that can be injected by this Component fun inject(activity: RegistrationActivity) fun inject(fragment: EnterDetailsFragment) fun inject(fragment: TermsAndConditionsFragment) } In AppComponent, we have to remove the methods that can inject registration view classes because these won't be used anymore, those classes will use the RegistrationComponent.
Instead, for the RegistrationActivity to create instances of RegistrationComponent, we need to expose its Factory out in the AppComponent interface.
AppComponent.kt
@Singleton @Component(modules = [StorageModule::class]) interface AppComponent { @Component.Factory interface Factory { fun create(@BindsInstance context: Context): AppComponent } // Expose RegistrationComponent factory from the graph fun registrationComponent(): RegistrationComponent.Factory fun inject(activity: MainActivity) } We expose the RegistrationComponent factory by declaring a function with that class as return type.
Now, we have to make AppComponent know that RegistrationComponent is its subcomponent so that it can generate code for that. We need to create a Dagger module to do this.
Let's create a file called AppSubcomponents.kt in the di package. In that file, we define a class called AppSubcomponents annotated with @Module. To specify information about subcomponents, we add a list of component class names to the subcomponents variable in the annotation as follows:
app/src/main/java/com/example/android/dagger/di/AppSubcomponents.kt
// This module tells AppComponent which are its subcomponents @Module(subcomponents = [RegistrationComponent::class]) class AppSubcomponents This new module also needs to be included in the AppComponent:
AppComponent.kt
@Singleton @Component(modules = [StorageModule::class, AppSubcomponents::class]) interface AppComponent { ... } AppComponent is now aware that RegistrationComponent is its subcomponent.
What does the application graph look like now?
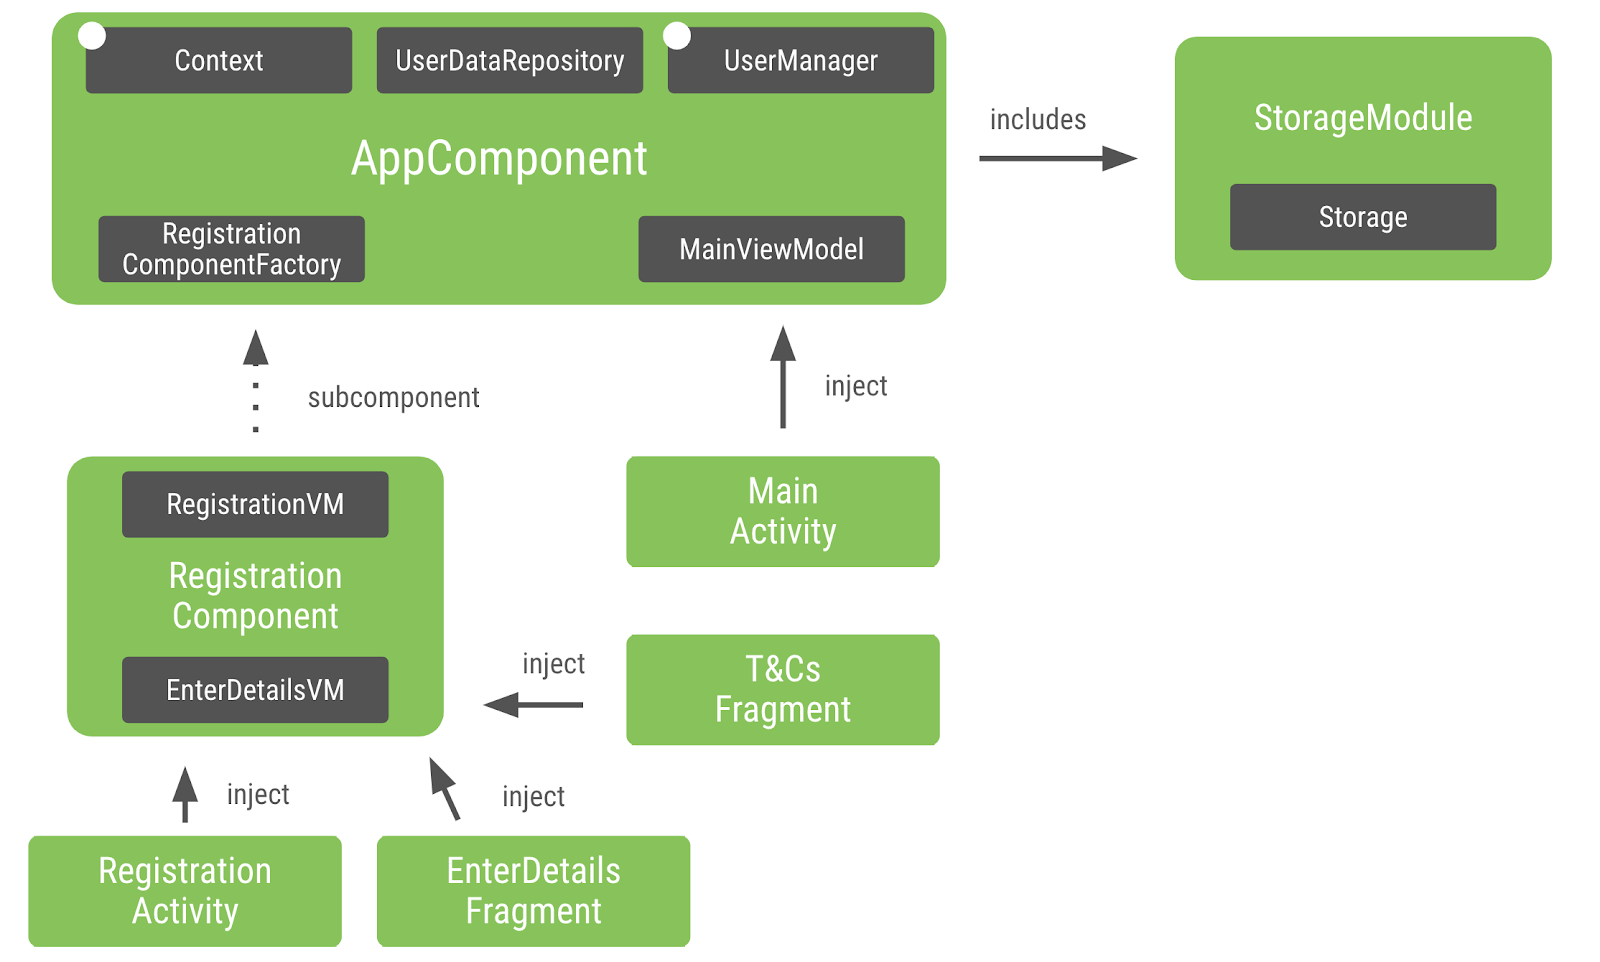
View classes specific to registration get injected by the RegistrationComponent. Since RegistrationViewModel and EnterDetailsViewModel are only requested by classes that use the RegistrationComponent, they're part of it and not part of AppComponent.
11. Scoping Subcomponents
We created a subcomponent because we needed to share the same instance of RegistrationViewModel between the Activity and Fragments. As we did before, if we annotate the Component and classes with the same scope annotation, that'll make that typehave a unique instance in the Component.
However, we cannot use @Singleton because it's already been used by AppComponent. We need to create a different one.
In this case, we could call this scope @RegistrationScope but this is not a good practice. The scope annotation's name should not be explicit to the purpose it fulfills. It should be named depending on the lifetime it has since annotations can be reused by sibling Components (e.g. LoginComponent, SettingsComponent, etc). That's why instead of calling it @RegistrationScope, we call it @ActivityScope.
Let's create a file called ActivityScope.kt in the di package and add the definition of ActivityScope as follows:
app/src/main/java/com/example/android/dagger/di/ActivityScope.kt
@Scope @MustBeDocumented @Retention(value = AnnotationRetention.RUNTIME) annotation class ActivityScope To scope RegistrationViewModel to RegistrationComponent, we have to annotate both the class and the interface with @ActivityScope.
RegistrationViewModel.kt
// Scopes this ViewModel to components that use @ActivityScope @ActivityScope class RegistrationViewModel @Inject constructor(val userManager: UserManager) { ... } RegistrationComponent.kt
// Classes annotated with @ActivityScope will have a unique instance in this Component @ActivityScope @Subcomponent interface RegistrationComponent { ... } Now a RegistrationComponent will always provide the same instance of RegistrationViewModel.
Subcomponents lifecycle
AppComponent is attached to the lifecycle of the Application because we want to use the same instance of the graph as long as the application is in memory.
What's the lifecycle of RegistrationComponent? One of the reasons why we needed it is because we wanted to share the same instance of the RegistrationViewModel between the registration Activity and Fragments. But we also want a new instance of RegistrationViewModel whenever there's a new registration flow.
RegistrationActivity is the right lifetime for RegistrationComponent: for every new Activity, we'll create a new RegistrationComponent and Fragments that can use that instance of RegistrationComponent.
Since RegistrationComponent is attached to the RegistrationActivity lifecycle, we have to keep a reference to the component in the Activity in the same way we kept the reference to the appComponent in the Application class. In this way, Fragments will be able to access it.
RegistrationActivity.kt
class RegistrationActivity : AppCompatActivity() { // Stores an instance of RegistrationComponent so that its Fragments can access it lateinit var registrationComponent: RegistrationComponent ... } Create a new instance of RegistrationComponent in the onCreate method before calling super.onCreate and inject registrationComponent instead of injecting the activity to the appComponent:
- Create a new instance of
RegistrationComponentby retrieving the factory from the appComponent and callingcreate. This is possible because we expose the functionregistrationComponentin theAppComponentinterface to return an instance of theRegistrationComponentfactory. - Assign that instance to the Activity's
registrationComponentvariable. - Inject the activity in the recently created
registrationComponentto perform field injection and populate the fields annotated with@Inject.
RegistrationActivity.kt
class RegistrationActivity : AppCompatActivity() { ... override fun onCreate(savedInstanceState: Bundle?) { // Remove lines (application as MyApplication).appComponent.inject(this) // Add these lines // Creates an instance of Registration component by grabbing the factory from the app graph registrationComponent = (application as MyApplication).appComponent.registrationComponent().create() // Injects this activity to the just created registration component registrationComponent.inject(this) super.onCreate(savedInstanceState) ... } ... } registrationComponent is available in the RegistrationActivity and we can use that instance to inject the registration fragments. Replace the onAttach method in the Fragments to use the registrationComponent from the Activity:
EnterDetailsFragment.kt
class EnterDetailsFragment : Fragment() { ... override fun onAttach(context: Context) { super.onAttach(context) (activity as RegistrationActivity).registrationComponent.inject(this) } ... } And do the same for the TermsAndConditions fragment:
TermsAndConditionsFragment.kt
class TermsAndConditionsFragment : Fragment() { ... override fun onAttach(context: Context) { super.onAttach(context) (activity as RegistrationActivity).registrationComponent.inject(this) } } If you run the app again and go to the Registration flow to start fresh as we did before, you can see that the registration flow works as expected. Note that Settings will cause the app to crash because it hasn't been refactored to use Dagger. We'll get to that later.
The application graph now looks like this:
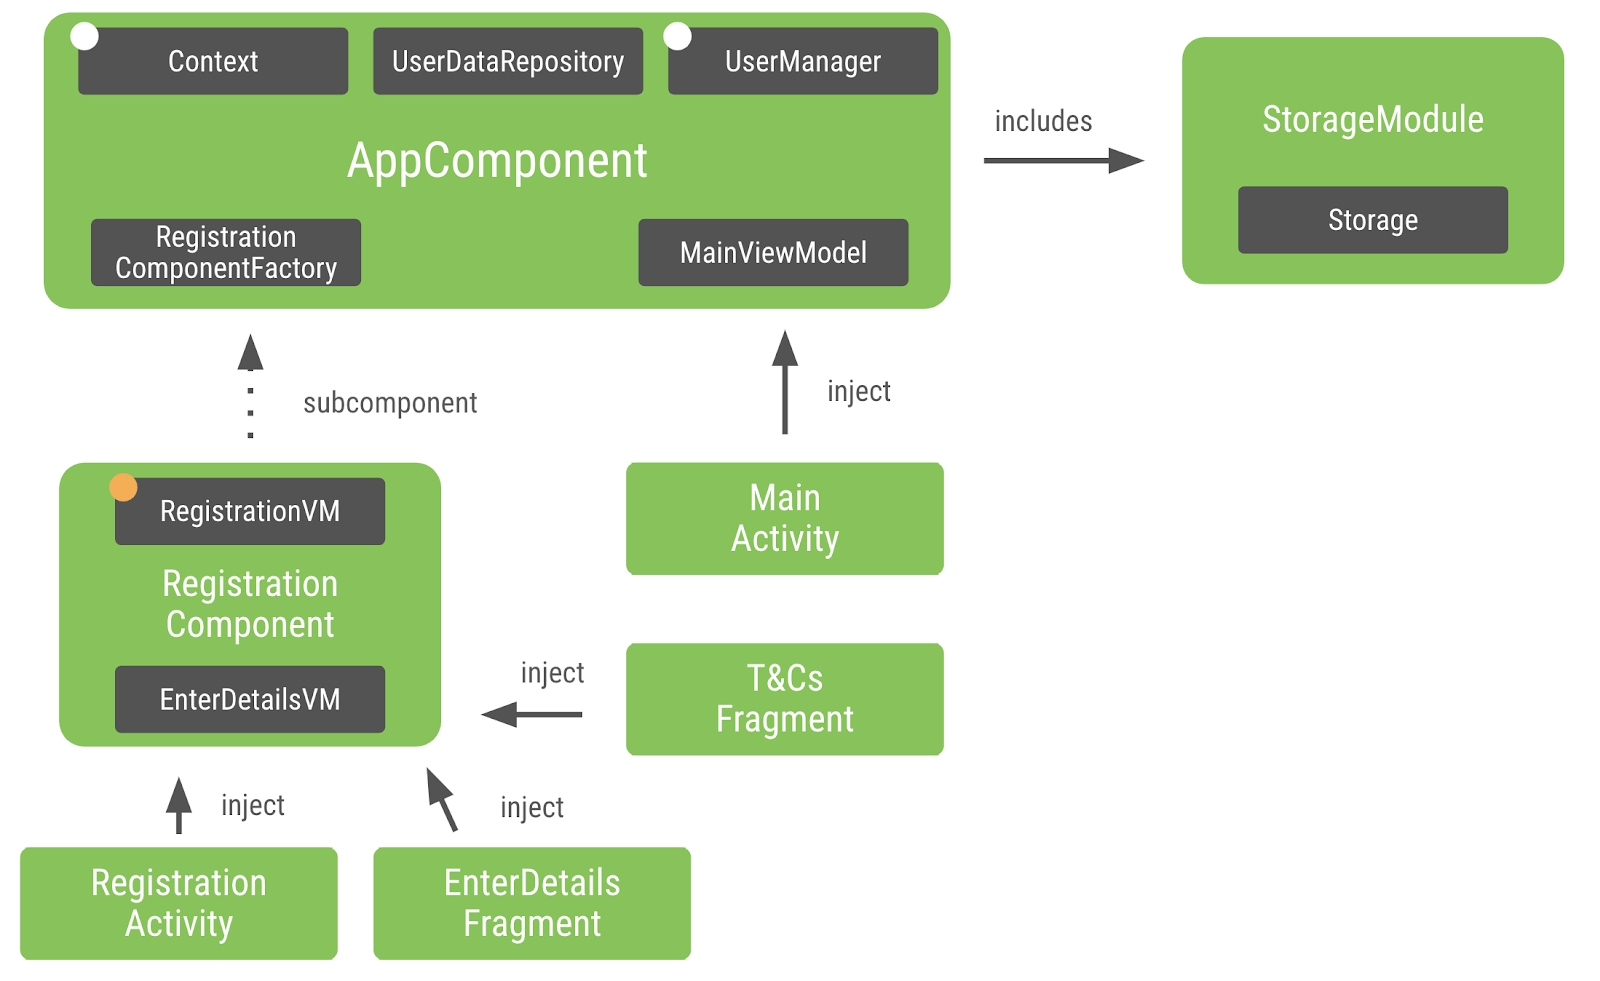
The difference with the previous diagram is that RegistrationViewModel is scoped to the RegistrationComponent, we represent that with a orange dot on RegistrationViewModel.
12. Refactoring the Login Flow
Apart from scoping objects to a different lifecycle, creating subcomponents is a good practice to encapsulate different parts of your application from each other.
Structuring your app to create different Dagger subgraphs depending on the flow of your app helps towards a more performing and scalable application in terms of memory and startup time. Avoid creating a monolithic Component that provides every object in your application as this will make the Dagger components difficult to read and modularize.
Let's refactor the Login flow to use Dagger by creating another subcomponent for the Login flow.
Create a file called LoginComponent.kt in the login package and add the definition of LoginComponent as we did with RegistrationComponent but this time, with Login-related classes.
login/LoginComponent.kt
// Scope annotation that the LoginComponent uses // Classes annotated with @ActivityScope will have a unique instance in this Component @ActivityScope // Definition of a Dagger subcomponent @Subcomponent interface LoginComponent { // Factory to create instances of LoginComponent @Subcomponent.Factory interface Factory { fun create(): LoginComponent } // Classes that can be injected by this Component fun inject(activity: LoginActivity) } We can annotate the LoginComponent with ActivityScope since the component will have the same lifetime as LoginActivity.
To tell Dagger how to create instances of LoginViewModel, we annotate its constructor with the @Inject annotation.
LoginViewModel.kt
class LoginViewModel @Inject constructor(private val userManager: UserManager) { ... } In this case, LoginViewModel doesn't need to be reused by other classes, that's why we shouldn't annotate it with @ActivityScope.
We also have to add the new subcomponent to the list of AppComponent's subcomponents in the AppSubcomponents module.
AppSubcomponents.kt
@Module(subcomponents = [RegistrationComponent::class, LoginComponent::class]) class AppSubcomponents For the LoginActivity to be able to access the LoginComponent factory, we have to expose it in the AppComponent interface.
AppComponent.kt
@Singleton @Component(modules = [StorageModule::class, AppSubcomponents::class]) interface AppComponent { ... // Types that can be retrieved from the graph fun registrationComponent(): RegistrationComponent.Factory fun loginComponent(): LoginComponent.Factory // Classes that can be injected by this Component fun inject(activity: MainActivity) } Everything is ready to create instances of LoginComponent and inject it in the LoginActivity:
- Annotate the
loginViewModelfield with@Injectsince we want it to be provided by Dagger and remove the private modifier. - Retrieve the
LoginComponentfactory fromappComponentcalling theloginComponent()method, create an instance ofLoginComponentwithcreate()and call theinjectmethod of the Component passing the activity in. - Remove the instantiation of
loginViewModelfrom the previous manual dependency injection implementation.
LoginActivity.kt
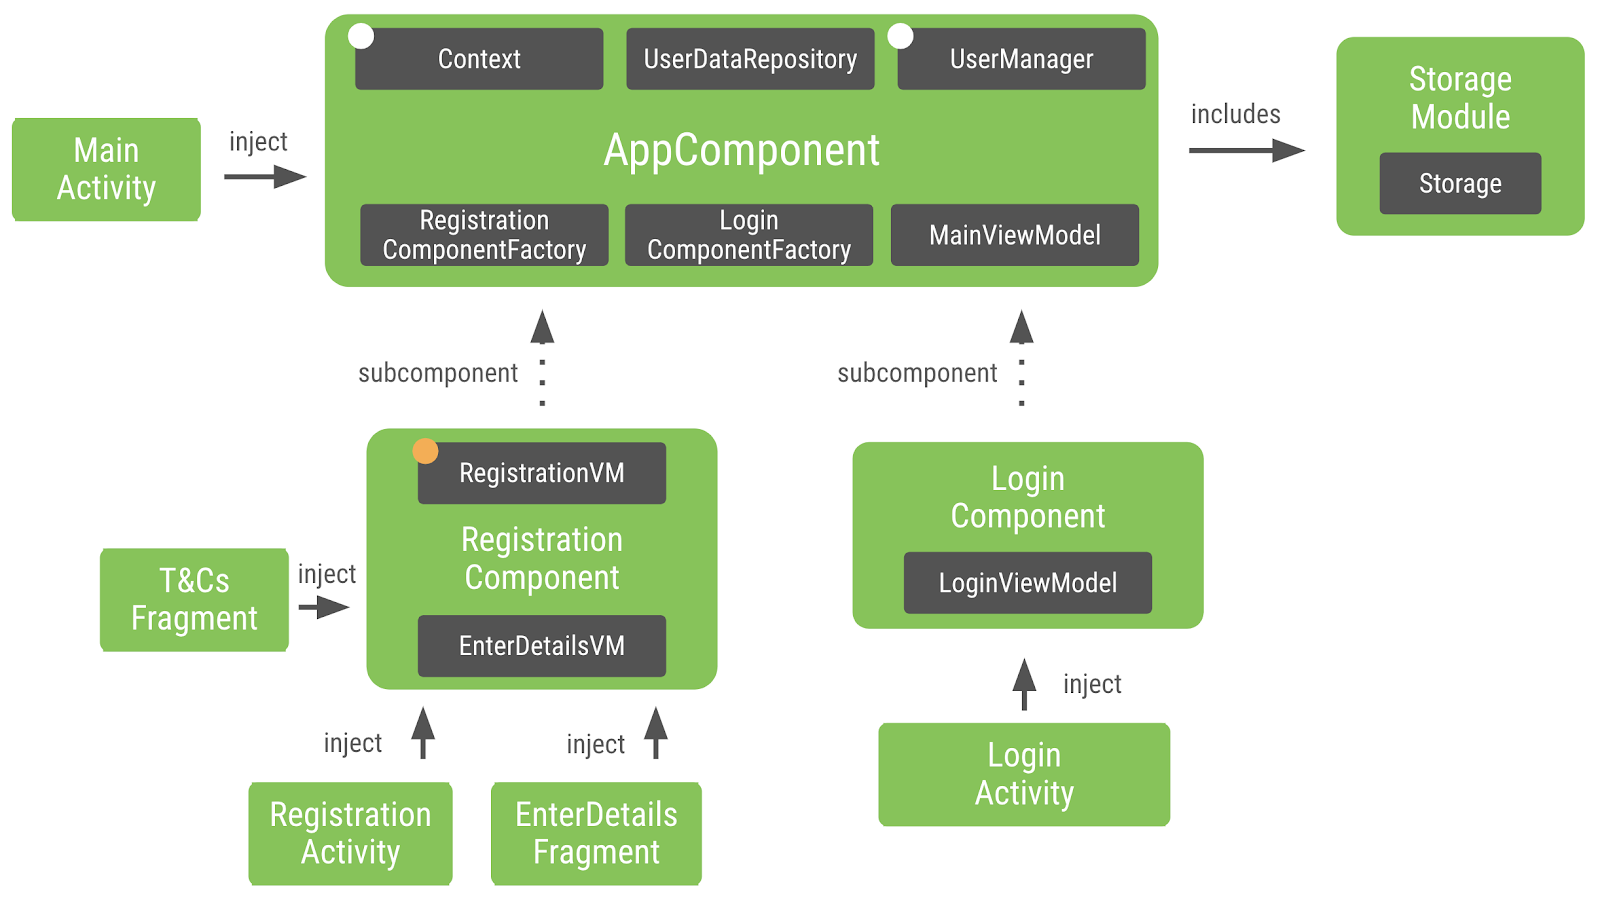
class LoginActivity : AppCompatActivity() { // 1) LoginViewModel is provided by Dagger @Inject lateinit var loginViewModel: LoginViewModel ... override fun onCreate(savedInstanceState: Bundle?) { // 2) Creates an instance of Login component by grabbing the factory from the app graph // and injects this activity to that Component (application as MyApplication).appComponent.loginComponent().create().inject(this) super.onCreate(savedInstanceState) setContentView(R.layout.activity_login) // 3) Remove instantiation loginViewModel = LoginViewModel((application as MyApplication).userManager) ... } } If you run the app again the login flow should now work correctly.
With the new LoginComponent, the application graph looks like this:
13. Multiple Activities with the same scope
Tapping the Settings button will cause the app to crash. Let's fix that by refactoring the Settings code to use Dagger.
Since we want SettingsActivity fields to be injected by Dagger:
- Tell Dagger how to create instances of
SettingsActivitydependencies (i.e.SettingsViewModel) by annotating its constructor with@Inject. Dagger already knows how to create instances ofSettingsViewModeldependencies.
SettingsViewModel.kt
class SettingsViewModel @Inject constructor( private val userDataRepository: UserDataRepository, private val userManager: UserManager ) { ... } - Allow
SettingsActivityto be injected by Dagger by adding a function that takesSettingsActivityas a parameter in theAppComponentinterface.
AppComponent.kt
@Singleton @Component(modules = [StorageModule::class, AppSubcomponents::class]) interface AppComponent { ... fun inject(activity: SettingsActivity) } - In
SettingsActivity, annotate injected fields with@Injectand remove the private modifier. - Inject the Activity accessing the
appComponentfromMyApplicationcallinginject(this)to populate the fields annotated with@Inject. - Remove the instantiations required by our old implementation of manual dependency injection.
SettingsActivity.kt
class SettingsActivity : AppCompatActivity() { // 1) SettingsViewModel is provided by Dagger @Inject lateinit var settingsViewModel: SettingsViewModel override fun onCreate(savedInstanceState: Bundle?) { // 2) Injects appComponent (application as MyApplication).appComponent.inject(this) super.onCreate(savedInstanceState) setContentView(R.layout.activity_settings) // 3) Remove following lines val userManager = (application as MyApplication).userManager settingsViewModel = SettingsViewModel(userManager.userDataRepository!!, userManager) ... } } If you run the app, you can see that the Refresh notifications feature in Settings doesn't work. That's because we're not reusing the same instance of UserDataRepository across MainActivity and SettingsActivity!
Can we scope UserDataRepository to AppComponent by annotating it with @Singleton? Following the same reasoning as before, we don't want to do it because if the user logs out or unregisters, we don't want to keep the same instance of UserDataRepository in memory. That data is specific to a logged in user.
We want to create a Component that lives as long as the user is logged in. All the Activities that can be accessed after the user is logged in will be injected by this component (i.e. MainActivity and SettingsActivity)
Let's create another subcomponent that we can call UserComponent as we did with LoginComponent and RegistrationComponent:
- Create a Kotlin file called
UserComponent.ktin theuserfolder. - Create an interface called
UserComponentannotated with@Subcomponentthat can inject classes that happen after the user is logged in and has a factory.
app/src/main/java/com/example/android/dagger/user/UserComponent.kt
// Definition of a Dagger subcomponent @Subcomponent interface UserComponent { // Factory to create instances of UserComponent @Subcomponent.Factory interface Factory { fun create(): UserComponent } // Classes that can be injected by this Component fun inject(activity: MainActivity) fun inject(activity: SettingsActivity) } - Add this new subcomponent to the list of
AppComponent's subcomponents in theAppSubcomponents.ktfile.
AppSubcomponents.kt
@Module(subcomponents = [RegistrationComponent::class, LoginComponent::class, UserComponent::class]) class AppSubcomponents What is in charge of the lifetime of UserComponent? LoginComponent and RegistrationComponent are managed by its Activities but UserComponent can inject more than one Activity and the number of Activities could potentially increase.
We have to attach the lifetime of this Component to something that knows when the user logs in and out. In our case that's UserManager. It handles registrations, log in and log out attempts so it makes sense for the UserComponent instance to be there.
If the UserManager needs to create new instances of UserComponent, it needs to access the UserComponent factory. If we add the factory as a constructor parameter, Dagger will provide it when creating the instance of UserManager.
UserManager.kt
@Singleton class UserManager @Inject constructor( private val storage: Storage, // Since UserManager will be in charge of managing the UserComponent lifecycle, // it needs to know how to create instances of it private val userComponentFactory: UserComponent.Factory ) { ... } In manual dependency injection, we had the user's session data stored in UserManager. That decided whether or not the user was logged in. We can do the same with the UserComponent instead.
We can keep an instance of UserComponent in UserManager to manage the lifetime of it. The user will be logged in if UserComponent is not null. When the user logs out, we can remove the instance of UserComponent. In this way, since UserComponent contains all the data and instances of classes related to a specific user, when the user logs out, when we destroy the component, all the data will be removed from memory.
Modify UserManager to use an instance of UserComponent instead of UserDataRepository:
UserManager.kt
@Singleton class UserManager @Inject constructor(...) { //Remove line var userDataRepository: UserDataRepository? = null // Add or edit the following lines var userComponent: UserComponent? = null private set fun isUserLoggedIn() = userComponent != null fun logout() { userComponent = null } private fun userJustLoggedIn() { userComponent = userComponentFactory.create() } } As you can see in the code above, we create an instance of userComponent when the user logs in using the create method of the UserComponent factory. And we remove the instance when logout() is called.
We want UserDataRepository to be scoped to UserComponent so that both MainActivity and SettingsActivity can share the same instance of it.
Since we've been using the scope annotation @ActivityScope to annotate components that have the Activity managing its lifetime, we need a scope that can cover multiple activities but not all the application, we don't have anything like that yet so we need to create a new scope.
Since this scope covers the lifetime when the user is logged in, we can call it LoggedUserScope.
Create a new Kotlin file called LoggedUserScope.kt in the user package and define the LoggedUserScope scope annotation as follows:
app/src/main/java/com/example/android/dagger/user/LoggedUserScope.kt
@Scope @MustBeDocumented @Retention(value = AnnotationRetention.RUNTIME) annotation class LoggedUserScope We can annotate both UserComponent and UserDataRepository with this annotation so that UserComponent can always provide the same instance of UserDataRepository.
UserComponent.kt
// Scope annotation that the UserComponent uses // Classes annotated with @LoggedUserScope will have a unique instance in this Component @LoggedUserScope @Subcomponent interface UserComponent { ... } UserDataRepository.kt
// This object will have a unique instance in a Component that // is annotated with @LoggedUserScope (i.e. only UserComponent in this case). @LoggedUserScope class UserDataRepository @Inject constructor(private val userManager: UserManager) { ... } In MyApplication class, we stored an instance of userManager needed by the manual dependency injection implementation. Since our app is fully refactored to use Dagger, we don't need it anymore. MyApplication looks like this now:
MyApplication.kt
open class MyApplication : Application() { val appComponent: AppComponent by lazy { DaggerAppComponent.factory().create(applicationContext) } } We have to modify AppComponent too:
- Remove the inject methods since
MainActivityandSettingsActivityare not going to be injected by this component anymore, they'll useUserComponent. - Expose
UserManagerfrom the graph sinceMainActivityandSettingsActivityneed it to access the instance of UserComponent.
AppComponent.kt
@Singleton @Component(modules = [StorageModule::class, AppSubcomponents::class]) interface AppComponent { ... // 2) Expose UserManager so that MainActivity and SettingsActivity // can access a particular instance of UserComponent fun userManager(): UserManager // 1) Remove following lines fun inject(activity: MainActivity) fun inject(activity: SettingsActivity) } In SettingsActivity, annotate the ViewModel with @Inject (since we want it to be injected by Dagger) and remove the private modifier. To grab the instance of UserComponent that will be initialized because the user is logged in, we call the userManager() method that the appComponent now exposes. Now, we can access the userComponent inside it and inject the Activity.
SettingsActivity.kt
class SettingsActivity : AppCompatActivity() { // @Inject annotated fields will be provided by Dagger @Inject lateinit var settingsViewModel: SettingsViewModel override fun onCreate(savedInstanceState: Bundle?) { // Gets the userManager from the application graph to obtain the instance // of UserComponent and gets this Activity injected val userManager = (application as MyApplication).appComponent.userManager() userManager.userComponent!!.inject(this) super.onCreate(savedInstanceState) ... } ... } MainActivity does the same thing to inject UserComponent:
-
UserManagershouldn't be injected anymore since we can grab it fromappComponentdirectly. Remove theuserManagerfield - Create a local variable before checking if the user is logged in or not.
- Since the
UserComponentwill be only available when the user is logged in, we get theuserComponentfrom theuserManagerand inject the Activity in theelsebranch.
MainActivity.kt
class MainActivity : AppCompatActivity() { // 1) Remove userManager field @Inject lateinit var userManager: UserManager @Inject lateinit var mainViewModel: MainViewModel override fun onCreate(savedInstanceState: Bundle?) { super.onCreate(savedInstanceState) setContentView(R.layout.activity_settings) // 2) Grab userManager from appComponent to check if the user is logged in or not val userManager = (application as MyApplication).appComponent.userManager() if (!userManager.isUserLoggedIn()) { ... } else { setContentView(R.layout.activity_main) // 3) If the MainActivity needs to be displayed, we get the UserComponent // from the application graph and gets this Activity injected userManager.userComponent!!.inject(this) setupViews() } } ... } All screens in our app have been refactored to Dagger! If you run the app, you can check that everything works as expected.
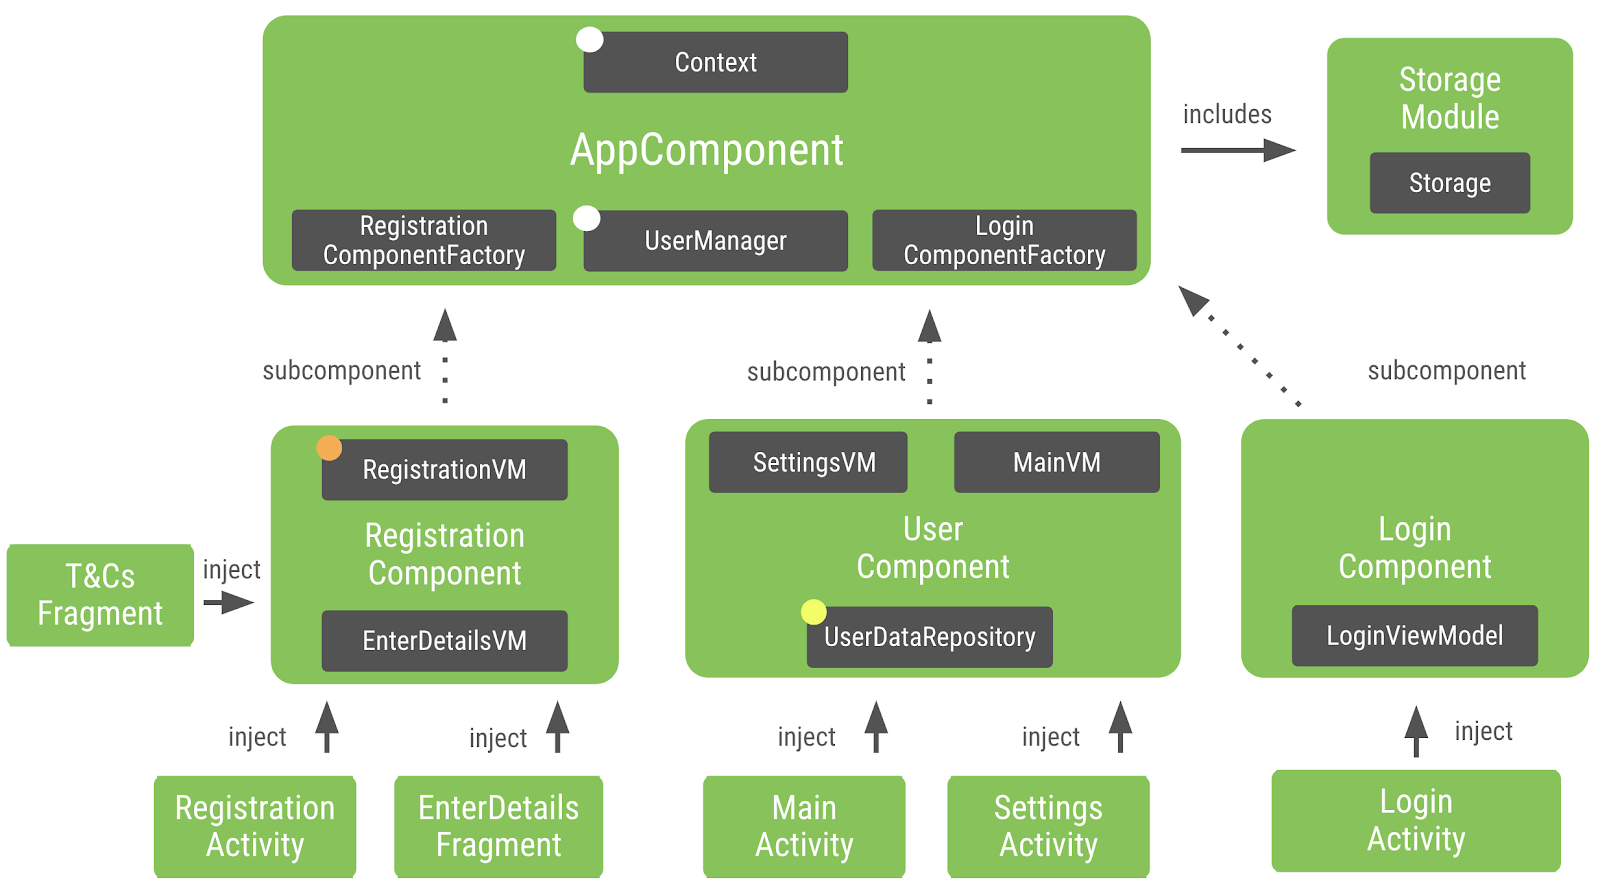
After adding UserComponent, the application graph looks like this:
14. Testing with Dagger
One of the benefits of using dependency injection frameworks like Dagger is that it makes testing your code easier.
Unit tests
You don't have to use Dagger-related code for unit tests. When testing a class that uses constructor injection, you don't need to use Dagger to instantiate that class. You can directly call its constructor passing in fake or mock dependencies directly just as you would if they weren't annotated.
For example, if you take a look at the LoginViewModelTest.kt file that tests LoginViewModel, we're just mocking UserManager and passing it as a parameter as we would've done without Dagger.
LoginViewModelTest.kt
class LoginViewModelTest { ... private lateinit var viewModel: LoginViewModel private lateinit var userManager: UserManager @Before fun setup() { userManager = mock(UserManager::class.java) viewModel = LoginViewModel(userManager) } @Test fun `Get username`() { whenever(userManager.username).thenReturn("Username") val username = viewModel.getUsername() assertEquals("Username", username) } ... } All unit tests remain the same as with manual dependency injection except one. When we added the UserComponent.Factory to UserManager, we broke its unit tests. We have to mock what Dagger would return when calling create() on the factory.
Open the UserManagerTest.kt file and create and configure mocks for the UserComponent factory as follows:
UserManagerTest.kt
class UserManagerTest { ... @Before fun setup() { // Return mock userComponent when calling the factory val userComponentFactory = Mockito.mock(UserComponent.Factory::class.java) val userComponent = Mockito.mock(UserComponent::class.java) `when`(userComponentFactory.create()).thenReturn(userComponent) storage = FakeStorage() userManager = UserManager(storage, userComponentFactory) } ... } Now all unit tests should pass.
End-to-end tests
We had our integration tests running without Dagger. As soon as we introduced Dagger in the project and changed the implementation of MyApplication class, we broke them.
Using a custom Application in instrumentation tests
Before that, our end-to-end tests were using a custom application called MyTestApplication. In order to use a different application, we had to create a new TestRunner. The code for that is in app/src/androidTest/java/com/example/android/dagger/MyCustomTestRunner.kt file. The code is already in the project, you don't have to add it.
MyCustomTestRunner.kt
class MyCustomTestRunner : AndroidJUnitRunner() { override fun newApplication(cl: ClassLoader?, name: String?, context: Context?): Application { return super.newApplication(cl, MyTestApplication::class.java.name, context) } } The project knows that this TestRunner needs to be used when running instrumentation tests because it's specified in the app/build.gradle file.
app/build.gradle
... android { ... defaultConfig { ... testInstrumentationRunner "com.example.android.dagger.MyCustomTestRunner" } ... } ... Using Dagger in instrumentation tests
We have to configure MyTestApplication to use Dagger. For integration tests, a good practice is to create a TestApplicationComponent meant for testing. Production and testing use a different component configuration.
What is the difference between our test configuration and our production configuration? Instead of using a SharedPreferencesStorage in UserManager, we want to use a FakeStorage. What's producing SharedPreferencesStorage? StorageModule.
We have to swap the StorageModule for a different one that uses FakeStorage. Since this is only required for instrumentation tests, we create this new class in the androidTest folder. Create a new package called di inside app/src/androidTest/java/com/example/android/dagger/.
There, create a new file called TestStorageModule.kt whose path is app/src/androidTest/java/com/example/android/dagger/di/TestStorageModule.kt.
app/src/androidTest/java/com/example/android/dagger/di/TestStorageModule.kt
// Overrides StorageModule in android tests @Module abstract class TestStorageModule { // Makes Dagger provide FakeStorage when a Storage type is requested @Binds abstract fun provideStorage(storage: FakeStorage): Storage } Because of how @Binds works, instead of declaring the method with SharedPreferencesStorage as a parameter, for the TestStorageModule, we pass FakeStorage as parameter. That will make the TestAppComponent that will create next use this implementation of Storage.
Dagger doesn't know how to create instances of FakeStorage, as always, we annotate its constructor with @Inject.
FakeStorage.kt
class FakeStorage @Inject constructor(): Storage { ... } Now we provide an instance of FakeStorage when Dagger requests a Storage type. Since production and testing use a different component configuration, we have to create another component that acts as our AppComponent. We'll call it TestAppComponent.
Let's create a new Kotlin file in the following path: app/src/androidTest/java/com/example/android/dagger/di/TestAppComponent.kt
app/src/androidTest/java/com/example/android/dagger/di/TestAppComponent.kt
@Singleton @Component(modules = [TestStorageModule::class, AppSubcomponents::class]) interface TestAppComponent : AppComponent We need to specify all the modules in this test Component too. Apart from TestStorageModule, we also have to include the AppSubcomponents module that adds information about its subcomponents. Since we don't need Context for our test graph (the only dependency that required Context before was SharedPreferencesStorage), there's no need to define a Factory for our TestAppComponent.
If you try to build the app, MyTestApplication gives a compilation error as you have to remove the userManager instance from the class. Also, you'll see that Dagger doesn't generate an implementation for TestAppComponent, it should've created a DaggerTestAppComponent class with the test graph. That's because kapt is not acting on the androidTest folder. You have to add the dagger annotation processor artifact to androidTest as follows:
app/build.gradle
... dependencies { ... kaptAndroidTest "com.google.dagger:dagger-compiler:$dagger_version" } Now if you sync the project and build the app, DaggerTestAppComponent will be available to use. If it doesn't, it's because it's not acting on the androidTest folder yet, try to run the instrumentation tests by right-clicking on the java folder inside the androidTest folder and click on Run 'All Tests'.
We have to make some changes to MyApplication to allow MyTestApplication to create its own Dagger Component.
Extract the appComponent initialization in the by lazy body out to a different method that we can override in the MyTestComponent called initializeComponents() and make it open.
MyApplication.kt
open class MyApplication : Application() { val appComponent: AppComponent by lazy { initializeComponent() } open fun initializeComponent(): AppComponent { return DaggerAppComponent.factory().create(applicationContext) } } Now, we can subclass MyApplication and use TestAppComponent in MyTestApplication:
- Remove the userManager instance if you haven't done it before.
- Override
initializeComponentmethod to make return an instance ofDaggerTestAppComponent.
MyTestApplication.kt
class MyTestApplication : MyApplication() { override fun initializeComponent(): AppComponent { // Creates a new TestAppComponent that injects fakes types return DaggerTestAppComponent.create() } } Tests should pass now. Open the ApplicationTest.kt file in the androidTest/java/com/example/android/dagger folder and click on the run button next to the class definition. The test should run and pass.
15. @Provides annotation and Qualifiers
There are other annotations that can be useful in an Android project.
@Provides
Apart from the @Inject and @Binds annotations, you can use @Provides to tell Dagger how to provide an instance of a class inside a Dagger module.
The return type of the @Provides function (it doesn't matter how it's called) tells Dagger what type is added to the graph. The parameters of that function are the dependencies that Dagger needs to satisfy before providing an instance of that type.
In our example, we could've also provided an implementation for the Storage type as follows:
StorageModule.kt
@Module class StorageModule { // @Provides tell Dagger how to create instances of the type that this function // returns (i.e. Storage). // Function parameters are the dependencies of this type (i.e. Context). @Provides fun provideStorage(context: Context): Storage { // Whenever Dagger needs to provide an instance of type Storage, // this code (the one inside the @Provides method) will be run. return SharedPreferencesStorage(context) } } You can use the @Provides annotation in Dagger modules to tell Dagger how to provide:
- Implementations of an interface (although
@Bindsis recommended because it generates less code and therefore it's more efficient). - Classes that your project doesn't own (e.g. instances of
Retrofit).
Qualifiers
We didn't have to use Dagger qualifiers in our project due to the simplicity of it. Qualifiers are useful when you want to add different implementations of the same type to the Dagger graph. For example, if we wanted different Storage objects to be provided, we could've differentiated them using qualifiers.
For example, if we had SharedPreferencesStorage taking the name of file as parameter:
SharedPreferencesStorage.kt
class SharedPreferencesStorage @Inject constructor(name: String, context: Context) : Storage { private val sharedPreferences = context.getSharedPreferences(name, Context.MODE_PRIVATE) ... } We can add the different implementations with @Provides in StorageModule. We can use the qualifiers to identify a kind of implementation.
StorageModule.kt
@Retention(AnnotationRetention.BINARY) @Qualifier annotation class RegistrationStorage @Retention(AnnotationRetention.BINARY) @Qualifier annotation class LoginStorage @Module class StorageModule { @RegistrationStorage @Provides fun provideRegistrationStorage(context: Context): Storage { return SharedPreferencesStorage("registration", context) } @LoginStorage @Provides fun provideLoginStorage(context: Context): Storage { return SharedPreferencesStorage("login", context) } } In the example, we defined two qualifiers: RegistrationStorage and LoginStorage that we can use to annotate @Provides methods. We're adding two types of Storage to the graph: RegistrationStorage and LoginStorage. Both methods return Storage, have the same parameters (dependencies) but a different name. Because the name in @Provides functions don't have any functionality, we have to retrieve them from the graph using the qualifier as follows:
Examples of how to retrieve qualifiers as dependencies
// In a method class ClassDependingOnStorage(@RegistrationStorage private val storage: Storage) { ... } // As an injected field class ClassDependingOnStorage { @Inject @field:RegistrationStorage lateinit var storage: Storage } You can achieve the same functionality as qualifiers with the @Named annotation, however qualifiers are recommended because:
- They can be stripped out from Proguard or R8
- You don't need to keep a shared constant for matching the names
- They can be documented
16. [Optional] Try Dependency Injection on your own
There's one more part of the codelab app for you to experiment with - adding a splash screen. MainActivity.kt currently decides which screen to show based on whether the user is registered or logged in.. That's problematic because we're doing conditional dependency injection, only injecting when the user is logged in and will remain on the MainActivity.
These steps don't contain comments or code, so try it on your own:
- Create a
SplashActivitywith aSplashViewModelthat decides which screen to display.. - As we've been doing, use dependency injection in
SplashActivityto get fields injected by Dagger. - Remove the logic in the
onCreatemethod of theMainActivity.ktsince when the Activity is opened, the user will be logged in.
17. Congratulations!
You're now familiar with Dagger and you should be able to add it to your Android app. In this codelab you learned about:
- How to create an Application graph using Dagger
@Componentannotation. - How to add information to the graph using
@Inject,@Module,@Bindsand@BindsInstanceannotations. - How to create flow containers using
@Subcomponent. - How to reuse instances of objects in different containers using Scopes.
- Dagger Qualifiers and
@Providesannotation. - How to test your application that uses Dagger with unit and instrumentation tests.
Can You Open Multiple Instances Of An App In Android
Source: https://developer.android.com/codelabs/android-dagger
Posted by: calderonades1986.blogspot.com
0 Response to "Can You Open Multiple Instances Of An App In Android"
Post a Comment